Search the Community
Showing results for tags 'atavism x (10.1.0)'.
Found 2 results
-
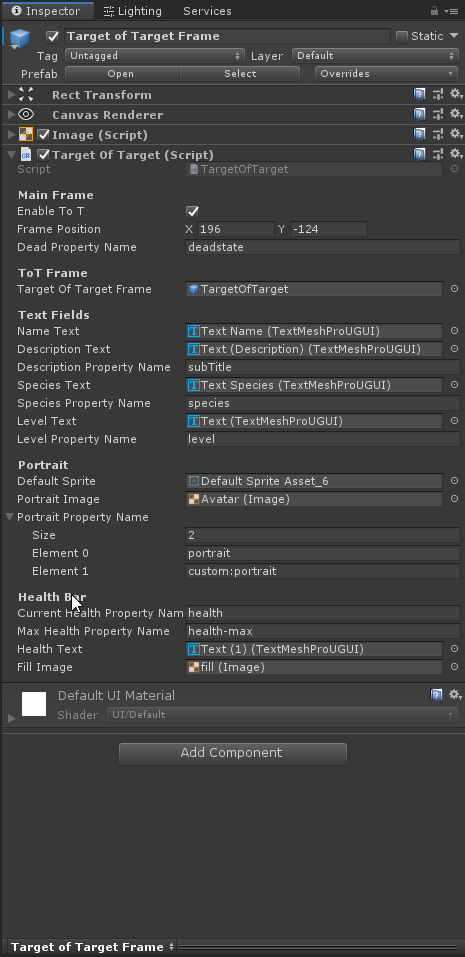
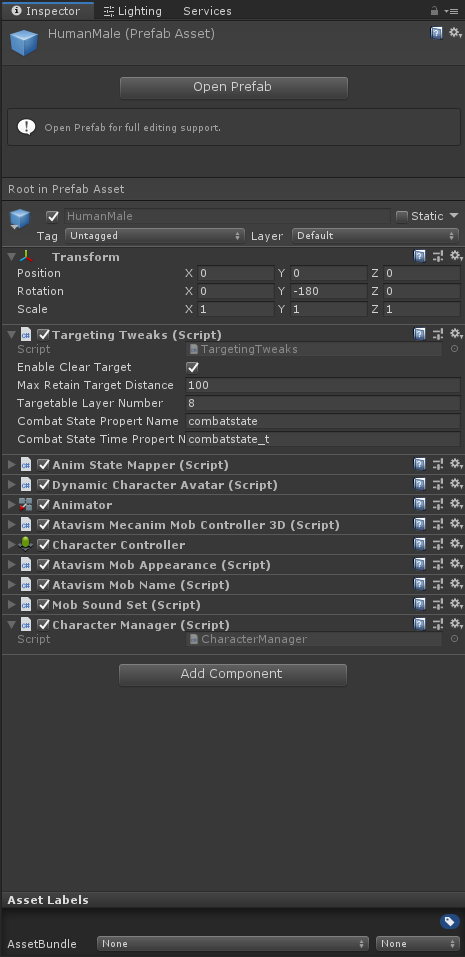
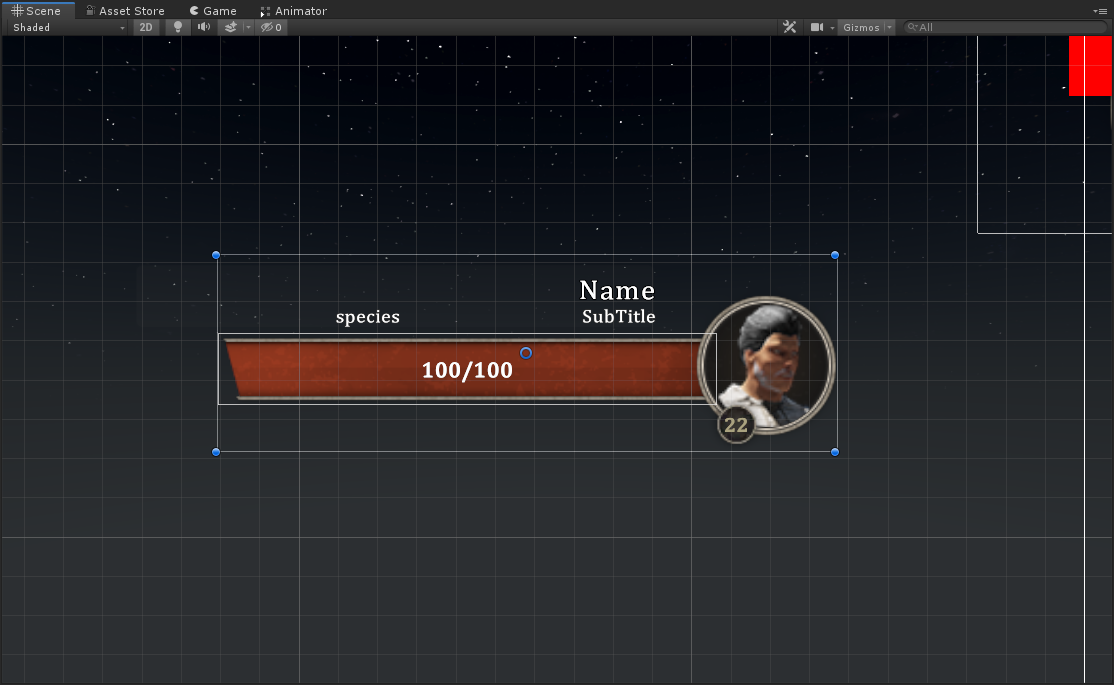
Latest Updates: 5/14/20 Fixed targeting behavior of friendly targets. Right clicking on a friendly target will no longer put you in combat mode if friendly target can be attacked by others. 5/13/20 Full rewrite of the Targeting. ClearTarget.cs has been replaced with TargetingTweaks.cs. Please replace the ClearTarget.cs with TargetingTweaks.cs. 5/12/20 Fix has been implemented into the updated package (Download link below). Please send me your feedback if you have problems. Thanks! Unfortunately, do too a recent job change that requires me to be gone for weeks at a time, I am unable to maintain these scripts properly and promptly. I encourage and permit anyone who wants to take the reins and use these scripts to develop their own versions. These scripts can be considered as OPEN SOURCE. Use them as you wish. I apologize for any inconvenience. Name: Target of Target and Targeting Tweaks Updated: 2020-05-14 Version: BETA By: 1stGenGamer Note: If you have any problems or issues please send me a message on discord https://discord.gg/5hA83k. Please understand that I'm sharing this because it may be useful for someone. It may all break with a Atavism update. You do not need to use both if there is one you don't want. This package was built and tested in in Unity v2019.2 with Atavsim 10.1 Package includes: Prefab of ToT frame - I made it in the UI of the MainWorld scene of Atavsim 10.1. Target Tweaks script TargetingTweaks.cs ------------------------------------- Tweeks the default targeting behavior to deselect the target based on distance and if you click off the target. Similar to WoW. Atavism currently does not restrict the targeting distance. So a known issue is, if the player clicks on a target beyond the scripts max target distance, the target frame will briefly appear then disappear. Place TargetingTweaks.cs on all your character prefabs in Assets/Resources. Your in the right place if you see "Atavism Mecanim Mob Controller 3D" script component. "Enable" turn it on and off. This is publicly available FirstGenMods.ClearTarget.Enable {get; set;} "Max Retain Target Distance" is the distance you can go from the target without loosing the target. Default is 100. "Targetable Layer Number" is the layer id of targetable objects. You can get this by expanding the "Layer" dropdown at the top of the inspector. Default is 8. "Combat State Property Name" the name of the property that indicates it's current combat state. Default is "combatstate" (no quotes). "Combat State Time Property Name" the name of the property that indicates it's current combat state time. Default is "combatstate_t" (no quotes). Target of Target (ToT) script TargetOfTarget.cs ----------------------------------------------- Adds ToT functionality. Currently does not display pet's target. For an example set up, see the Target of Target Frame prefab in the prefab folder. Create a transparent Image object/container as a child frame of the main target frame. Place your ToT frame or the provided prefab as a child of the frame you just created. Plase the TargetOfTargetScript.cs on the container frame you created. Fill in the references. Look at the prefab in the Prefab folder for an example. You may be able to drop the prefab on to your Canvas at it will just work. I recommend placing it as a child of the main target frame. Main Target Frame |-- Container Frame <-- Script here |-- ToT Frame "Enable" turn it on and off. This is publicly available FirstGenMods.TargetOfTarget.Enable {get; set;} "Frame Position" The Rec Pos X and Pos Y the frame will move to when loaded. Once set, you can drag it somewhere in the editor so you can work on it. "Dead Property Name" the name of the target property that indicates dead. Default is "deadstate" (no quotes). "Target Of Target Frame" Reference to the child ToT frame. "Name, Description, Species, Level" TextMeshPro text objects. "Default Sprite" Sprite used for the portrait if the target one can't be found. "Portrait Image" The Image object used to display the portrait. "Level Property Name" the name of the target property that indicates it's level. Default is "level" (no quotes). "Current Health Property Name" the name of the target property that indicates it's current health. Default is "health" (no quotes). "Max Health Property Name" the name of the target property that indicates it's max health. Default is "health-max" (no quotes). "Health Text" the TextMeshPro text object used to display the health numbers. "Fill Image" Image object with slider used to display the health bar. Download Unity Package: https://drive.google.com/open?id=11W_pnLlTOed4haDvw3KO25eIdF3a5TXT Just get the scripts: TargetingTweaks.cs https://bitbucket.org/JANDD661/workspace/snippets/Lry5M7/targetingtweakscs TargetOfTarget.cs https://bitbucket.org/JANDD661/workspace/snippets/Eb75A8/targetoftargetcs

-
When Making new instances, it seems there are a few important steps not mentioned in the tutorial. Here's a few things that might help those that are trying to figure this out. BEFORE YOU START BUILDING A NEW INSTANCE - Creating an Empty scene and building it will not work out of the box. You must include the "Canvas Objects" From the "BlankAtavismScene"!! Go to Assets > Dragonsan > Scenes > and locate "BlankAtavismScene" Press "Ctrl-D" to Duplicate the Scene. Rename the Scene (be SPECIFIC) Add the scene you just created to the "Build Scenes" "File > Build Settings > Build Scenes > Add your new scene drag and drop in window" Save the Scene and Save the Project (With the New Instance / Scene you just created) Open Atavism Editor Follow the Tutorial (Listed Below it's the same procedure) When Creating - Be Sure to name the "New Instance" Identical to "Scene you just created" and Identical to "Scene Added to - Build List" Copy and Paste the Name (Or the Scene manager will throw an error if it's misspelled and Unity will stop) No Blank spaces.. it's the not the same as saying "UnityScene1 = UnityScene1" and "Unity Scene 1 != UnityScene1" STRING NAMES MATTER! Save the Project, Save the Scene - Restart your server. Alternatively - Advanced Method Load the "BlankAtavismScene" Assets > Dragonsan > Scenes create a "new folder" rename the folder to "Canvas Assets to include in all new instances" In the Editor > Scene > Objects, Drag these 5 items Into the new folder. Canvas EventSystem MainCamera MiniMap WorldBoundary When creating or adding a "New Scene" to your project be sure to include these in Every Scene you create/add. (I'd stick with the 1st method.) (** Disclosure - You will need to change the "minimap" settings for each scene using this method) ***Atavism compares the build scene in the list and the "interactive Object you create" by "string name". So if you're adding an "Instance or scene" add it to the build menu and make sure it has the same name on the server (When you save and restart the server)